How to learn embroidery designs easily is a delightful and fulfilling endeavor. By following this step-by-step guide, you can easily develop your skills, from mastering basic stitches to creating intricate designs.
Remember to gather the necessary supplies, practice regularly, explore design resources, and engage with embroidery communities. With time, patience, and creativity, you’ll be able to create stunning embroidery designs that showcase your unique style and talent. Happy stitching!
Part 1 – Understanding all the tools and learning each tool well.
How each tool works and what is made of them. Like leaf, flower, how the logo design will be made.
By learning this design course program, you can easily make any design on clothes, as you must have seen Cap, Jeans, Dress, bags, Garment, and every logo of anything else.
In this part, we will learn different tools of design course and also learn to make design.
Which program is required in computer to learn Embroidery design course?
First of all, we need Wilcom ES to make the design which you must have. If not, then you will have to buy License program (Designing Course) by inquiring from their site. By the way, all other designing programs are available in the market, but I will teach you from this.
Nowadays it is the era of digital era and today a lot of work on computer has started getting in different fields, for that you have to learn what you are interested in.
Wilcom is a computerize program for designing. In this program, first you have to prepare the design on the computer and convert that file into the one that supports the Work Machine, and then copy that converted file through a pen drive and load it into the Embroidery Machine’s computer.
Then that design has to be set in the machine, it is called Set Aria. So that there is no problem in running the machine and the machine can run smoothly. With which you can make many different types of designs by machine.
Now what materials can you run on this machine, so let’s have a look at them too. In this, you can make any work with thread, sequence, code, zari, those etc. material.
Know about the menu bar of this program.
Let’s see how to make design in wilcom.
I am going to teach you this program in the simplest language, so you should understand and learn all the tools carefully so that one day you can learn well and become a good designer. So let’s start understanding this program.
First of all you open Wilcom.

We have to set the grid which is visible in the above image.
The Auto start and end point which is visible in it to make the design means that the machine will start working from there, you can also set your own according to that, I will tell you further.
Now first of all we have to know all the tools of this page and understand which tools are known by what name and what work they do.
So let’s go to the next photo and I think you have to take a printout of it so that it will be easy for you to remember all the tools.
- Stitch Bar
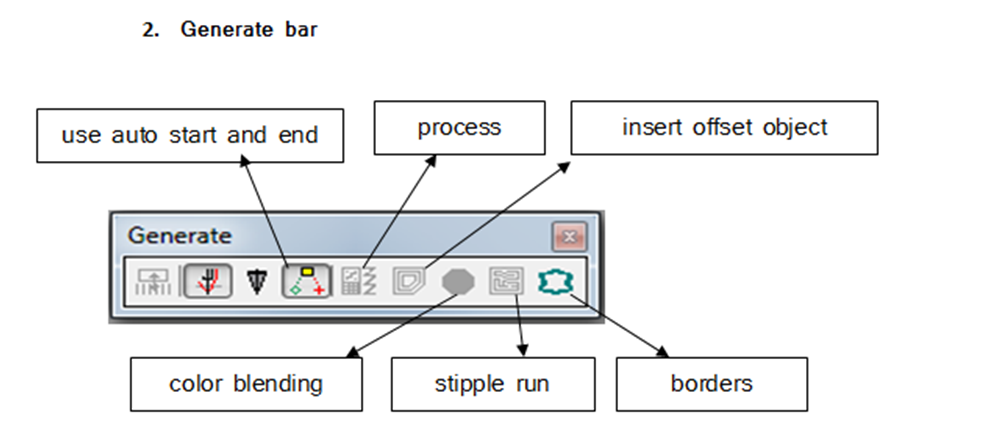
- Generate Bar
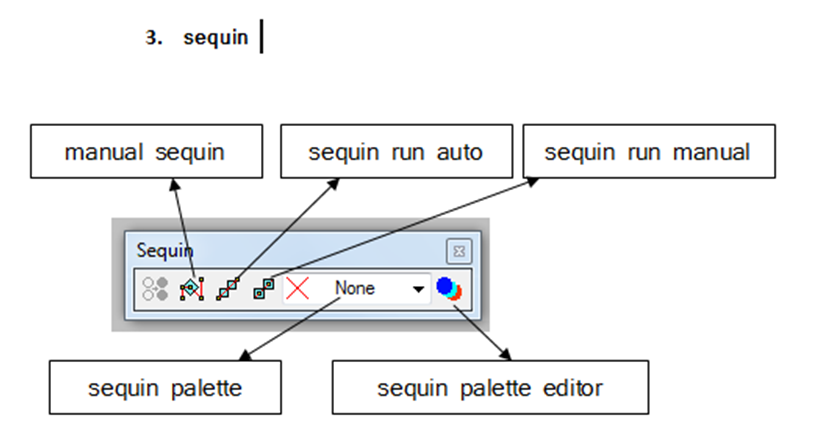
- Sequin
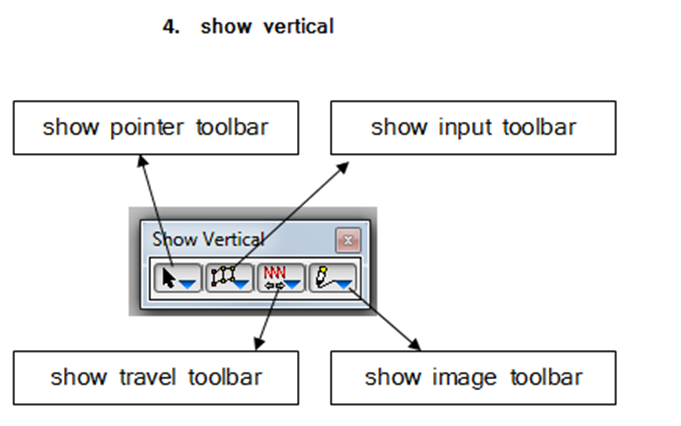
- Show Vertical
- Stitch Type
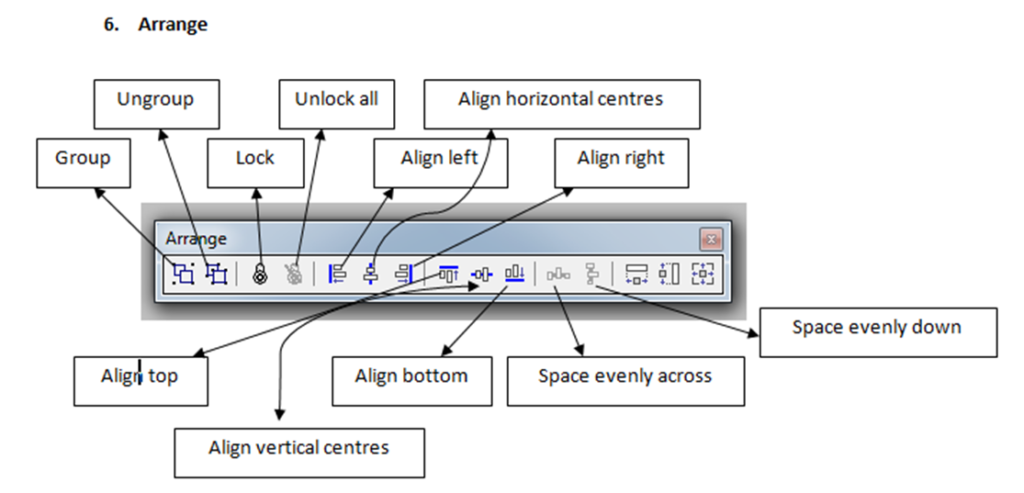
- Arrange
- Chenille
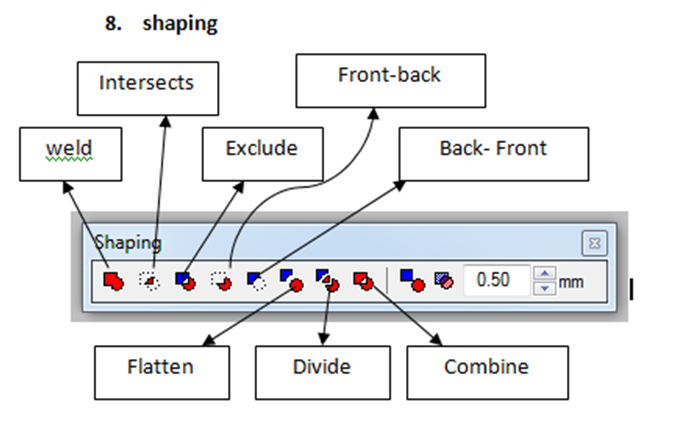
- Shaping
- Show pointer
- Show Travel bar
- Show Input Bar
- Show Image Toolbar
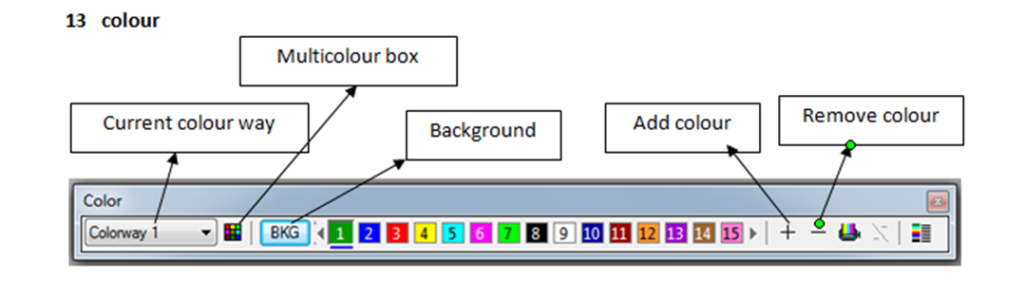
- Color
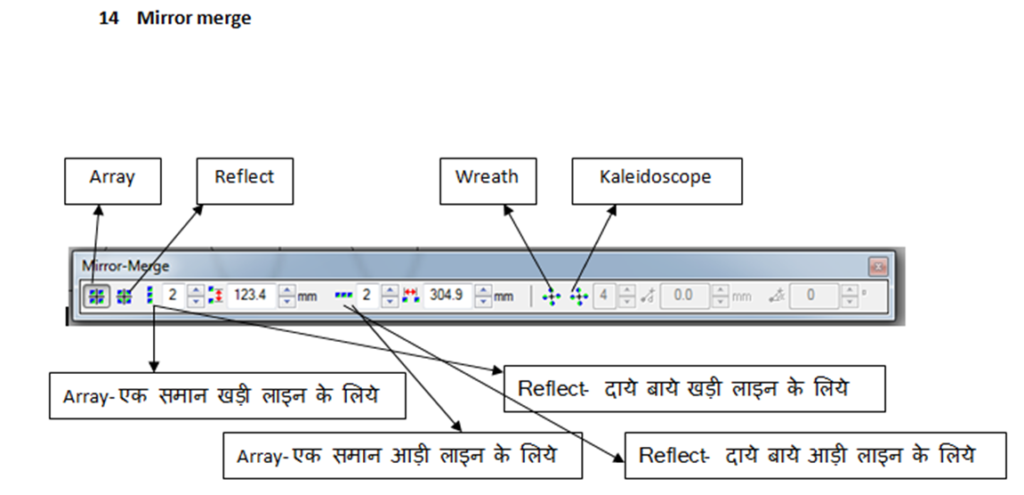
- Mirror Merge
- Transform
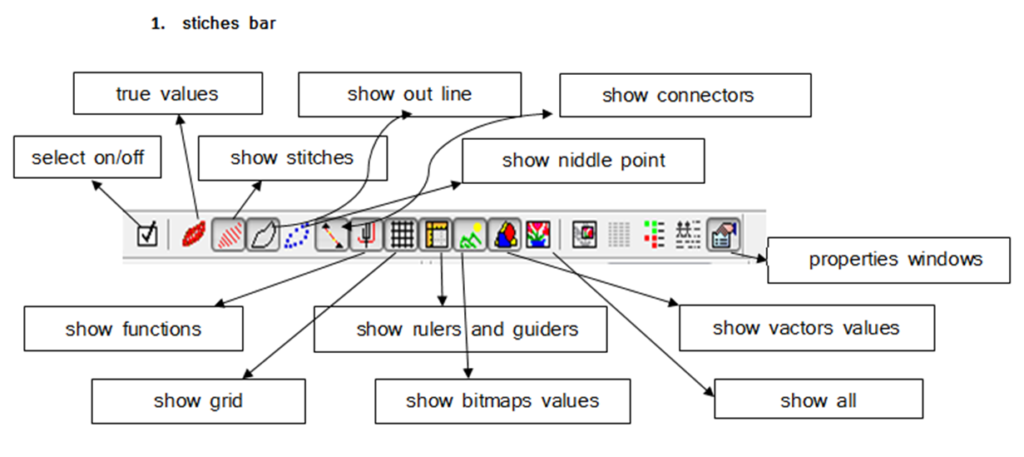


You have to see all these menu bars carefully and understand them well.
Let’s learn how design is made.
First of all, we have to set the Aria to work, which you have to do from the Grid value, keep in mind that the Aria size of each machine is different. They measure according to (250, 300, 400, cm), now this measuring machine is available in most of the market.
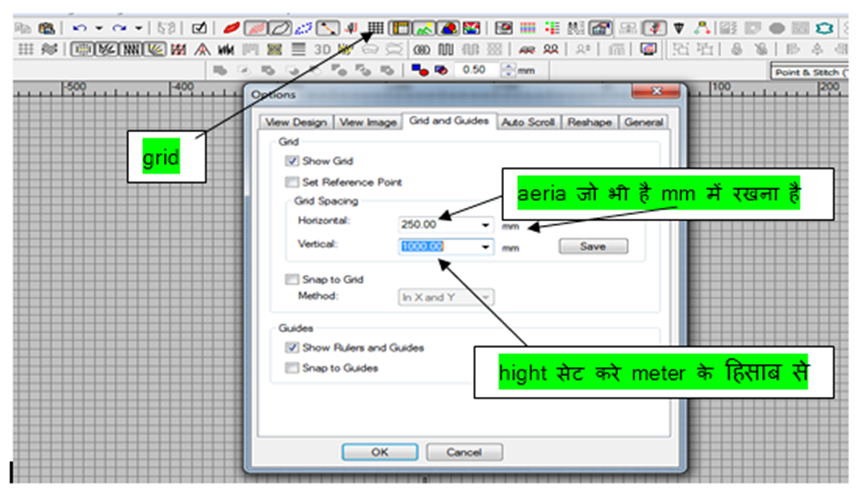
Aria and Height we have to decide according to the fabric means to say that in how many meters you want to work.
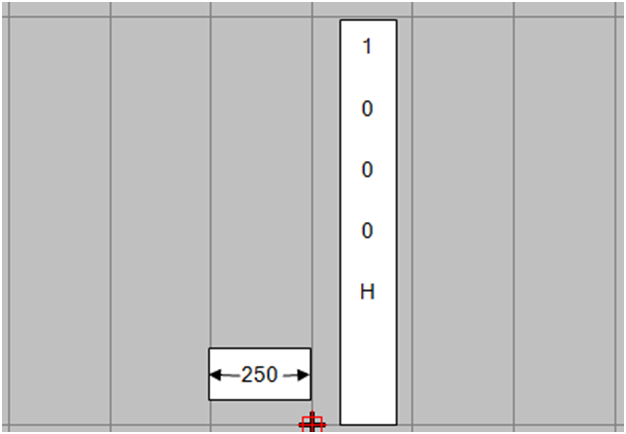
Take an example, if the Aria is 250, you have to work 1 meter towards the machine, then you will have to run 4 heads, 250*4 = 1000, so according to this, our 1 meter and height has to be set according to your cloth. |

You can see this as an example.
Now we make design by setting Aria.
Lesson 1
Now we have to make design in the middle of this Aria itself, which is box, we have to make design in that only. If the design goes outside the chord, the machine will stop and the head may also collide.
- input A : By selecting input A, we have to use the left and right buttons of the mouse first, then we have to click the left button of the mouse, after that we have to click the left button for the second time very close to it, now we have to go a little higher. To make the shape of a leaf in a little cross on the side, we have to click the right button of the mouse button and in front of it, we have to click the right button again, then we have to do the same process a little above, which we did twice in the lower left side. Just click and then press enter, then our betel leaf will be ready, which you can see in the image below.
- Then according to what I have shown in the image, you can increase or decrease the stitch (thread spacing), for that the auto spacing given below the spacing has to be clicked and OK, then you will be able to set above and reduce the stitch count in that. Can be kept less than (.40, .50, .60, .65, .70) or more. If you want to keep regular stitch then keep it till .60 to .80, that too you will understand from the image.
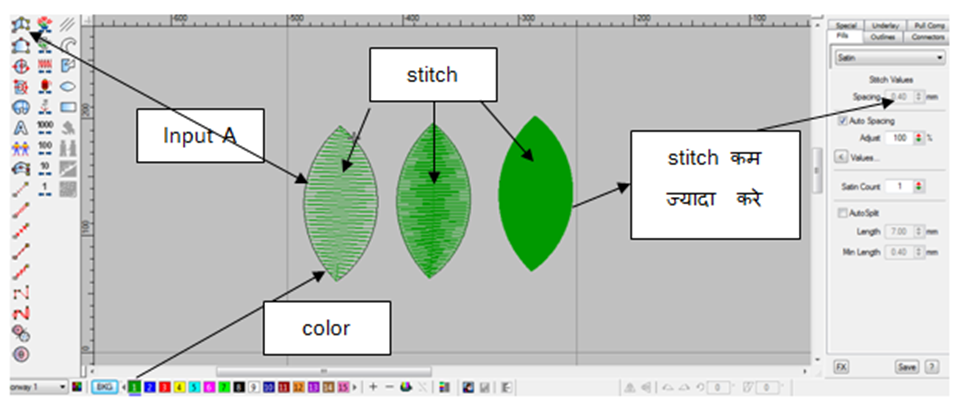
- Now you can see how I have made betel leaves here. This address is made from input A tools and satin stitch has been used in it. Here I have made 3 leaves, in which different stitches have been given in all the three, the first one has the maximum, the middle one has a little less and the last one has the least. So according to this you can do more or less stitch in the leaf. And with the color given below, you can set the color according to your own. I have shown you which stitch comes from above, so you can keep whatever stitch you want to make on top of the cloth.
- For the first time when you will make a leaf, its shape will not look right, so for that we have to do some practices. Let’s see how we will correct that too.
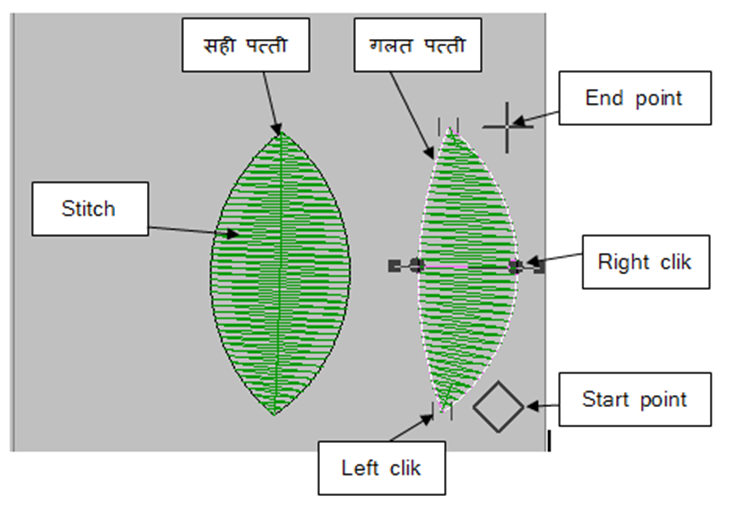
Now you will see the above image, you will understand that how the right leaf looks like and what the wrong leaf looks like. So we can move it inside by clicking reshape tools (press H for shortcut) and keep pressing enter, then you will know how much to correct.
Now all the boxes have been shown in it, the start point is visible written in it, we started making leaves from them and finished it where the end point is visible. Start and end point means that from where do we want to start while running in the machine and where do we want to end, then we can adjust the point accordingly.
The symbol of left click which is visible is square and the symbol of right click which is visible is round, what happens with this, where we have to corner, there will be left click and where we have to round You have to right click there, then you can make any type of leaf or flower.
Keep one thing in mind, now you are making this leaf from input A, with this tools you have to click twice together, it cannot be made with a single click, so keep this in mind. Different leaves are made from all the tools, so you will learn to use all of them one after the other.
If you do the practices of one tool everyday, then very soon you will know how to make leaves. You have to make a different type of leaf everyday with these tools.
I am giving you some images of leaves made from input A.

- Input B : We can create different mirror work like this with Input B tools. In which you must have seen the glass work done somewhere.
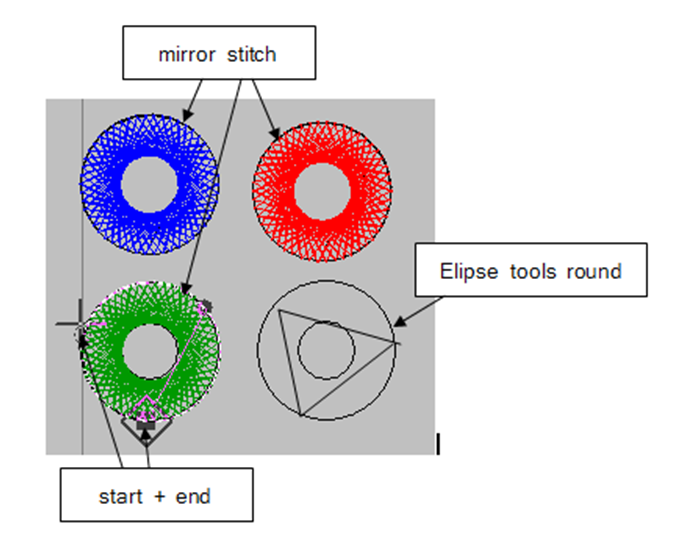
So in the above image you will see how the mirror is made. First of all, you have to round as much as you want the mirror size by using ellipse tools.
Then where the start point is shown, you have to start it by left click with the mouse, then draw a line touching the round which is visible inside, left click where the end point is visible, then move the line to the front side. Go there and left click, then bring down the line, left click where you started and press enter once, then walk the same way again and round on it and finish where the end point is visible. If you have to press enter then your mirror will be complete.
This process has to be done 2 times only then your mirror will be made.
- Complex Fill – There is an option of 3 order so let’s see how it works.
With this we can make any kind of leaf. Next, we made a leaf by clicking twice in input A, however it will not be made in this, we will move forward by clicking only once and we can give the shape of the leaf as we want. Let’s learn from the image given below.
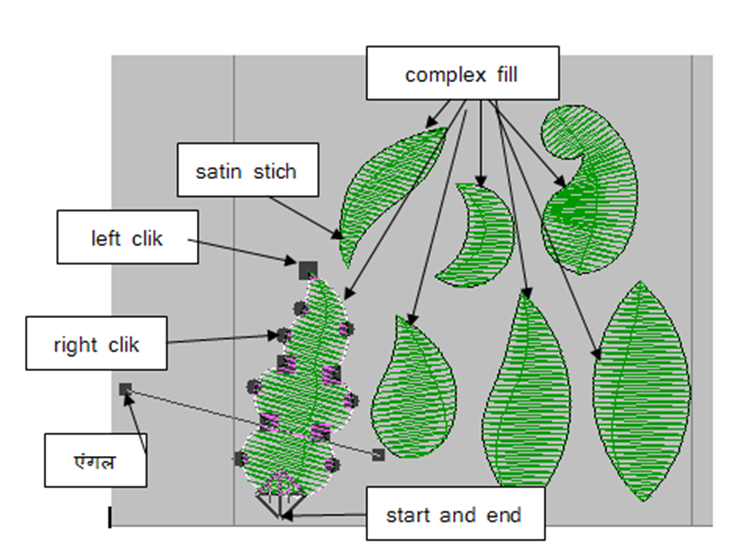
All these leaves are made from complex fill. With these tools, you can make the shape of the leaf you want. You can also keep the angle of the stitch in it as you want, which I have shown you above. Where you want to give a corner, you have to left click and where you want to round, you have to right click, I have told you further.
All these practice is the most important, the more you practice, the sooner you will get the result. After making the leaf, we have to join the start and end point below as shown in the picture. So this is the work of complex fill, now let’s move on to the next tools.
Shaping correction has to be done by pressing the shortcut key H.
Note: All the leaves and flowers are made from input A and complex fill, keep this in mind. So keep on practicing these two tools to the maximum.
We will pay more attention to the regular tools which are used in this program because you will get confused in understanding all the tools and for some tools the machine also comes different, so don’t worry. Whatever I am teaching, you will learn it 100% and you will also be able to work.
- fusion fill : The work of both fusion fill and complex fill is similar, just like you are making a leaf with complex fill, similarly fusion fill will also make a slight difference, so now we will move towards the next tools.
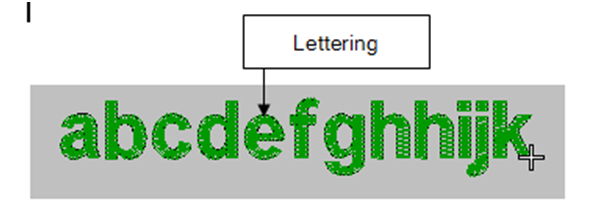
- Lettering tools: If we want to write anything with these tools, we can write.
So first you have to select this tools then write then press enter nothing will appear on the screen after you press enter so you have to press G from keyboard then your written will appear.
With these tools, the logo which you have seen on jeans, cap and t-shirt is made with the help of these tools.
Now we have learned how to make a leaf, now let’s learn how to make a line.
- Input C: With these tools, we will make a line or you can also say run. By the way, casts are made of many types, I will explain to you further. This is such a tool that with this we can reduce the thickness of the branch.
- If you have to right click on this tool, then that option will open where you can set it. And stitch can also be done less and more. What you can see in the image below, then this is the work of input c.
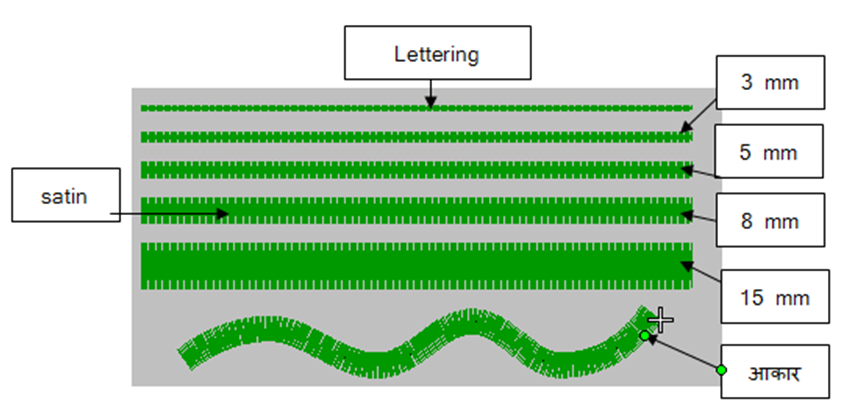
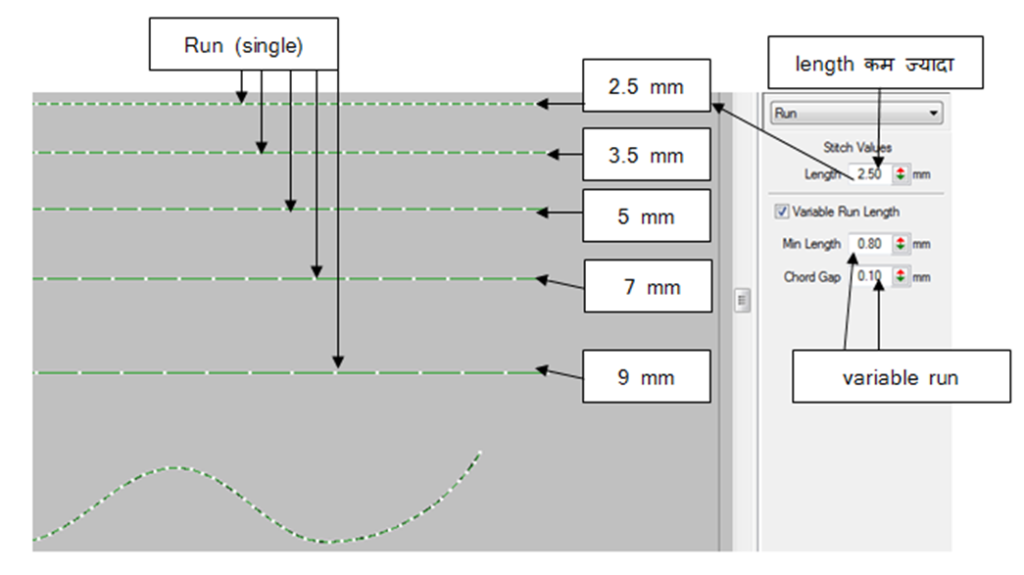
- Run: These tools are useful for making run. With these tools, we can make many lines and add leaves on them, so run comes in handy.
- We can keep the lines (run) in different lengths. minimum 2.5 which is regular then you can keep the length of run like 3,4,5,6,7. The shorter and regular the run, the more the machine will run at speed and the production will also increase. If the production comes less, then you will get less benefit of the machine, so keep this in mind.
- So I have shown you everything in the image below, so you have to set it. In variable run, you can keep length 1.5, 2, 2.5 by setting up and down. By keeping this, our machine will hold taka well and finishing will also be good. As you must have seen that a good stitch and its proper grip. So you can also use variable run.
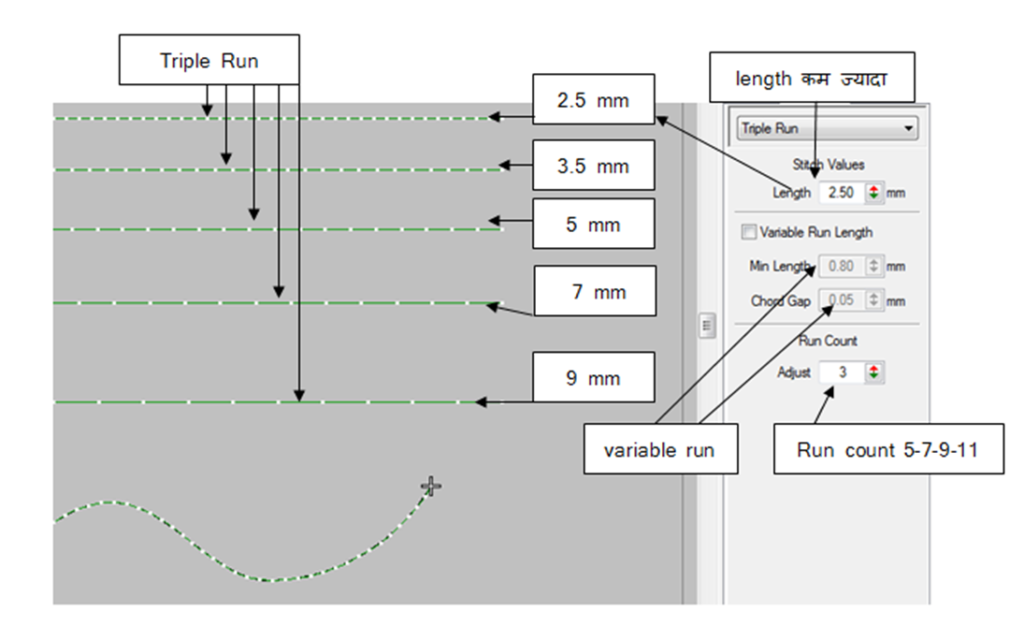
- Triple Run: It means that this run runs on the same stitch 3 times, hence it is called triple run. If we have to increase the branch a little in some work, then this run will be used.
- In this you can run the run according to 3,5,7,9 count. And like I have told above that you can set the variable run in this also.
- Motif Fill: We can take different types of motifs from motif run and if we want a new motif according to our own, we can also make it.
- We can keep the size X and Y of the motif according to our own and can also set the spacing. Below I have given all the details in the image, you can see the name of each motif, its size, its patent and spacing.
- Now we will understand from one more image how the new motif is made.


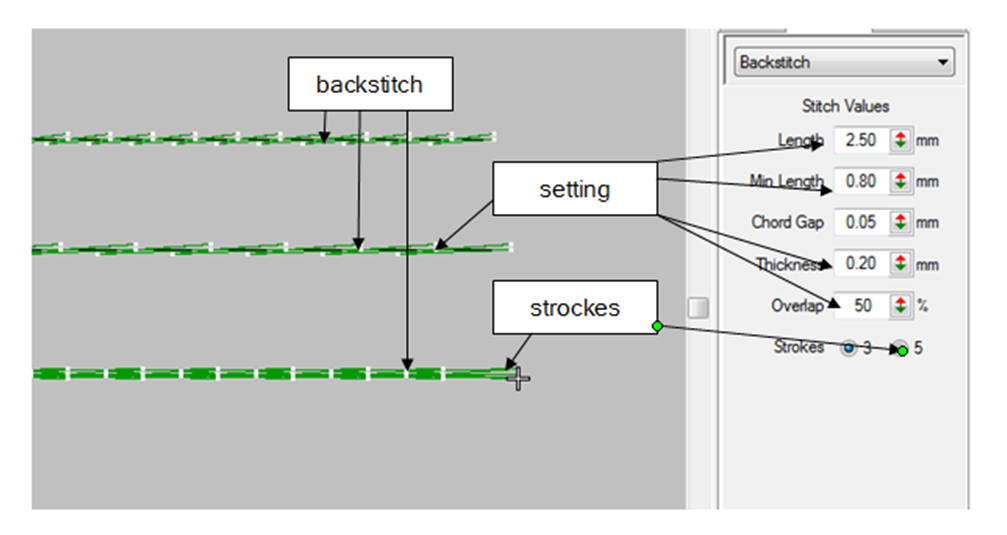
- Back stitch: This stitch looks like a zigzag. This stitch can improve the look of the design. You can also make the back stitch smaller or bigger, I am showing it in the image below.
- As in the image given below, you will know how all three different back stitches have been made. To increase, you use strokes, it can be up to 5 runs from what is visible.
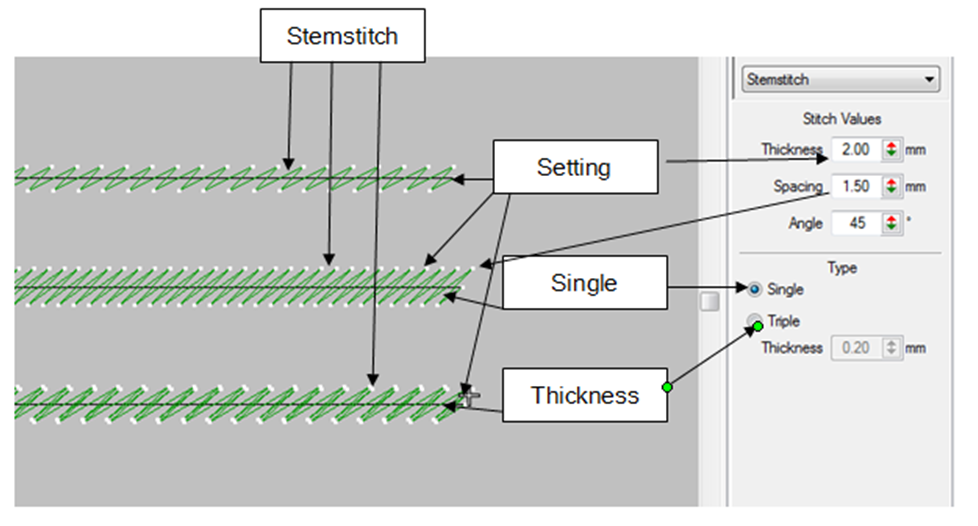
- Stem stitch: This stitch is slightly colder than the back stitch, in this also you can adjust the setting accordingly. Its thickness can also be reduced or increased.
- I have shown all the different settings in the image below, in one the spacing has been increased and in one triple run has been given, so you can do all the settings as you want to run. This stitch makes the design look great if you do not have any problem in increasing the stitch.
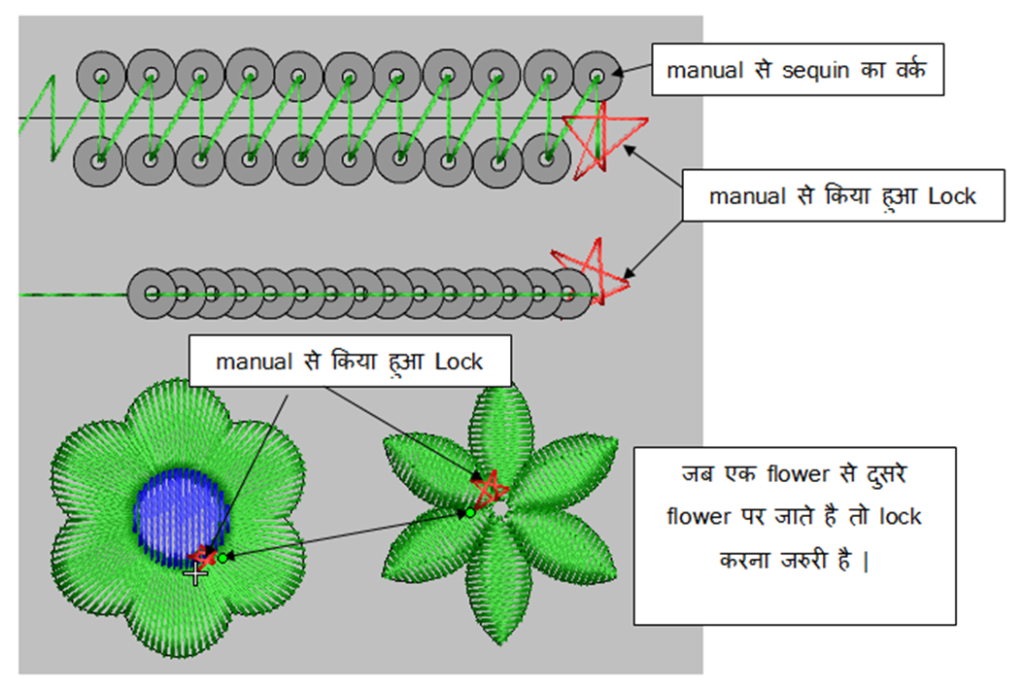
- Manual and Triple Manual: We understand both these tools together. Mostly manual tools are used to add single sequin in their own way.
- It is also useful to put a lock at the end of the design, so that the thread does not open from there after the design is finished, like we sew something by hand and lock it at the end.
- Triple manual also has the same process. You can see in the image given below that I have made a star with red color, it is called Lock.
- The sequin I have added manually, but our time is wasted in adding sequins with these tools. I will show you the simple way of sequin, so that you can easily add sequin
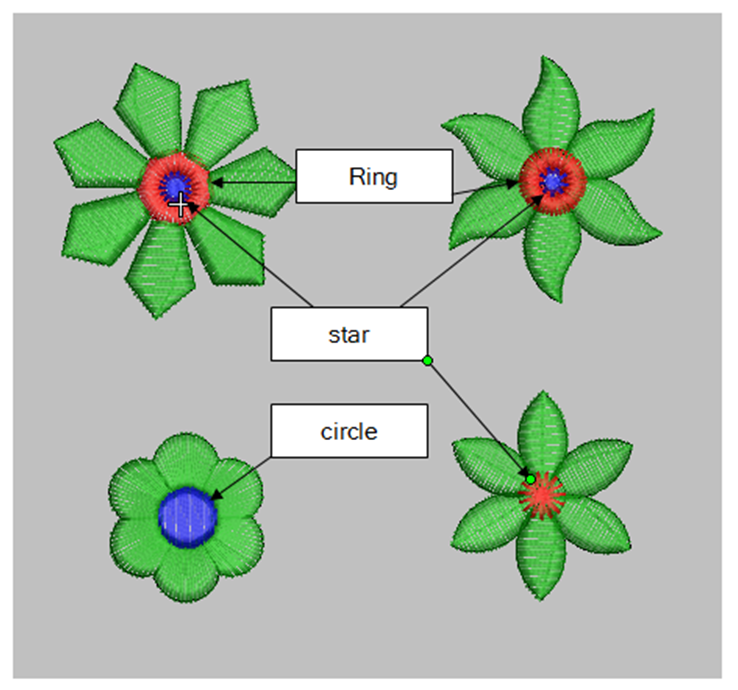
Circle / Star and Ring: I have shown these three tools together. You can do more or less stitch in all these tools. And how do all three look, that too I have shown the image below, so you can put all these above in any flower accordingly.
Here we learned to make a leaf and with which tools it is made, which stitch is put in it, and what type of it is made.
See also which type of caste (run) it is and what type it is.
Now we will learn to make flower in the image below and will make it in different stitches so that you will get to know about the stitch as well. So let’s see in the next image how flowers are made. To make flower you have to use mirror merge tools.
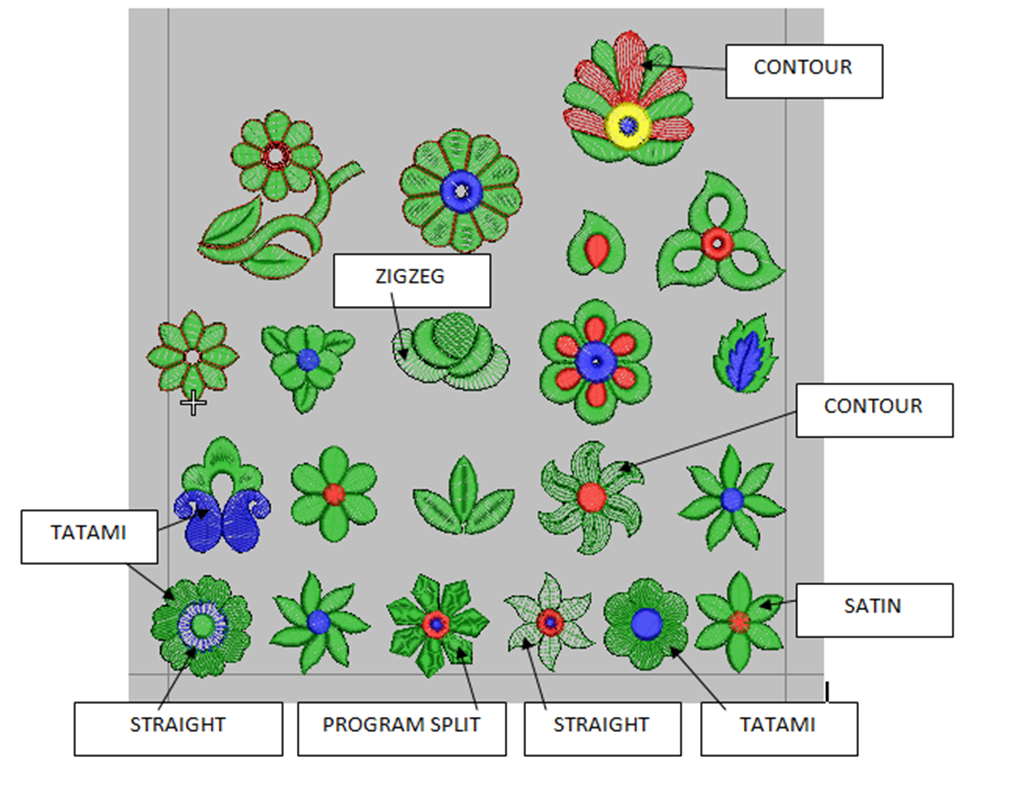
Flower pattern
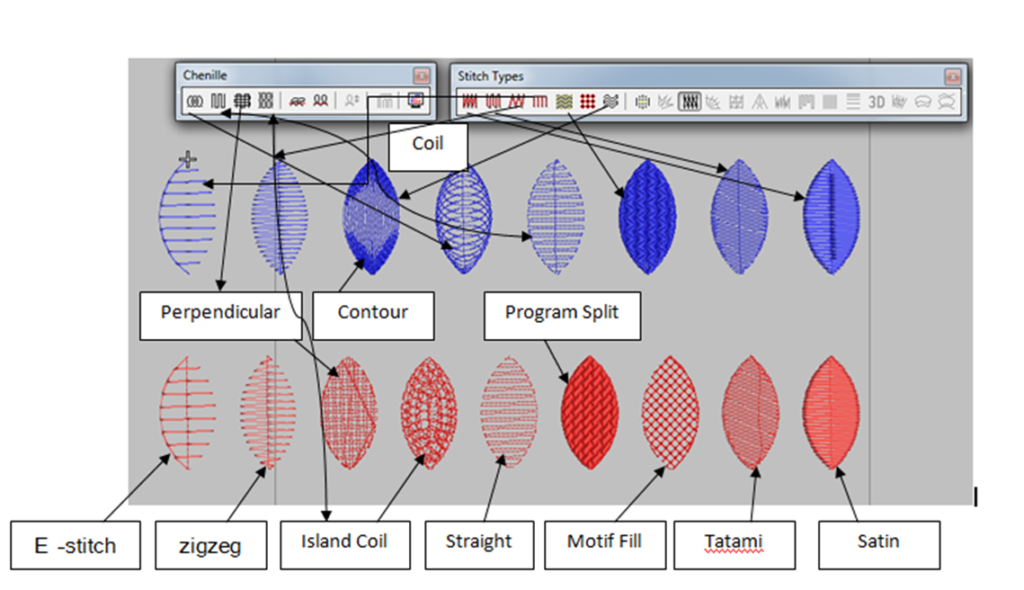
On the one hand, we understand everything about stitch from the image. So I have clearly shown in the image given below by writing and also giving the image of their toolbar. Now it will be easy for you to understand and learn. You have to specially remember this image and also do the practices.
In the image below, I have made 2 lines of 2 identical leaves. In which all the leaves of the first line are made from input A and the leaves of the second line are made from complex fill because in the tools shown below many leaves will be made from input A and many leaves will be made from complex fill only. You have to remember that complex fill will not work where input A is used.
Example: Both coil and contour are made of leaf input A, you will not be able to make it with complex fill.
I have given all the leaves made from both the tools in different stitches below which you can see.
So here our Lesson 1 is completed. After this, in Lesson 2, we will learn how the complete design is made and how it is set in the machine.
embroidery design course fees
You do not need to go anywhere else to learn computer embroidery course because in usanewsread.com this entire course is taught absolutely free of cost and when it comes to fees, it is charged differently worldwide.
Shortcut keys for each tool list
- zoom – Z
- ZOOM OUT – SHIFT Z
- GROUP – CTRL G
- UN GROUP – CTRL U
- View full design – F2
- LOCK – K
- UNLOCK – SHIFT K
- DESIGN TRUE VALUES – T
- STITCH HIDE – S
- SHOW OUTLINE – L
- NIDDEL POINT – KEYBOARD (.)
- SHOW JUMP – SHIFT C
- SEQUENCE – SHIFT F
- BULK SEQUENCE – Q
- GRID – SHIFT G
- SHOW BITMAP (SCAN IMAGE) – D
- CUT – CTRL C
- PASTE – V
- Design to run in computer – Shift R
- To put sequences together – Q
- INPUT A – SHIFT A
- JUMP CHECK – SHIFT J
- REPEAT CHECK – W
- After showing the letter – enter G
- RESHAPE – H
- SELECT OBJECT – O
- STITCH EDIT – E
We have worked very hard to make this course, so you learn it well and earn money, nowadays online design work is also available, so learn this part and wait for the next part.
If there is any problem in learning anything, then you can answer the question in the comment box below.
See you next in part-2…
Conclusion
By learning the program learned in this Design Course -Embroidery Design Free, you can easily make any design on the cloth, as you must have seen Cap, Jeans, Sari, Dress, Kurtis, Garment, and you can make logo of anything. yes |
FAQ-How to learn embroidery designs easily
How to create embroidery designs free?
Any design can be made very easily on wilcom ES which is taught for free on this article usanewsread.com.
How to do embroidery step by step?
Here I have taught the complete embroidery course in 3 lessons, which will be very easy for you to understand.
Which software is used for embroidery designs?
Complete design making course of wilcom ES software is taught through this software.
Can you self teach embroidery?
Yes, through this wilcom ES computer rise program, the work of all the tools and how to design them is taught with photos.
How long does it take to learn embroidery?
If you learn and practice all 3 lessons very well, then more than one month can be taught.
different types of machine embroidery stitches pdf
SATIN STITCH
RUNNING STITCH
CORDING STITCH
DORI WORK
FANCY STITCH
STEM STITCH
COIL AND CONTOUR STITCH
BACK STITCH
MANUAL AND TRIPLE MANUAL
MOTIF FILL
COMPLEX FILL
LETTERING TOOLS
FREE PDF DOWNLOAD
embroidery classes near me with fees
You do not need to go anywhere else to learn computer embroidery course because in usanewsread.com this entire course is taught absolutely free of cost and when it comes to fees, it is charged differently worldwide.
machine embroidery classes for beginners
This complete course, taught absolutely free on usanewsread.com, is made up of 3 parts.


1 thought on “How to learn embroidery designs easily 2023 free”
Comments are closed.