In this part how to learn embroidery designs, we will learn how to run the last work design in the machine. This is the last step of the design course, which you have to learn and understand carefully so that you can make the whole design easily.
As you have learned to draw the design in two parts and make a complete new design in the second part, now after this work, the most important thing is to run the design on the machine.
It is very important to learn how the work is done on the machine, so learn it very carefully. If you want to work on any cloth on top of the machine, then you have to set it properly in this program which is called punching, for this you do not have to set directly on the machine, keep in mind that.
After the complete design is made, it has to be converted into a different format like DST file in pen drive, so keep in mind that the design you have made in computer is made in emb format.
Lesson 3: You will have to put a lot of hard work in Punching, only then the machine will run properly.
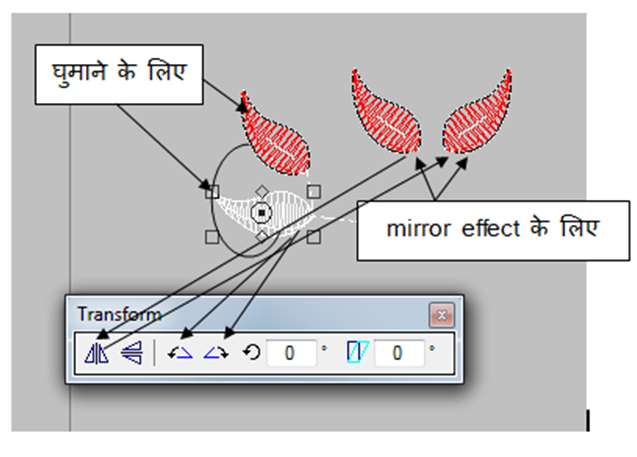
Whenever you start making the design, then to connect the leaf with the branch, it has to be rotated from different angles, then first you have to click on the leaf once, then the black dark point will be visible all around, then it has to be clicked once again. Due to which the point like the image shown below will come all around, then it has to be rotated by holding any one point as you want. And you can give the right direction to the leaf by keeping the round point which is visible in the middle at any place of the leaf.
If you want to make the leaf face to face, then you can use mirror effect, that too is given in the image below. Then keep adding leaves on top of the branch.
computer embroidery design course
We have made this course in three parts, the part you are seeing, after making the complete design, it has to be punched to run smoothly in the computerized machine, which is taught very well in this part
how to make punching design on computer
The entire design has to be punched in the computer, that means it has to be set correctly.
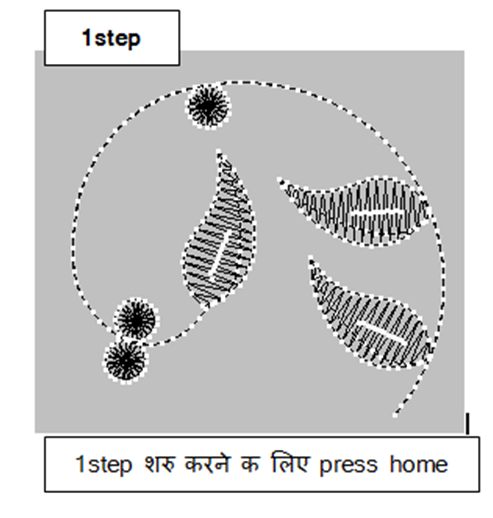
Now first of all we have to start punching by drawing complete design, see in next image.
First of all press the home button on the keyboard. As soon as you press home, the view of your design will appear black as seen in the image below. This whole process will be done from keyboard only.
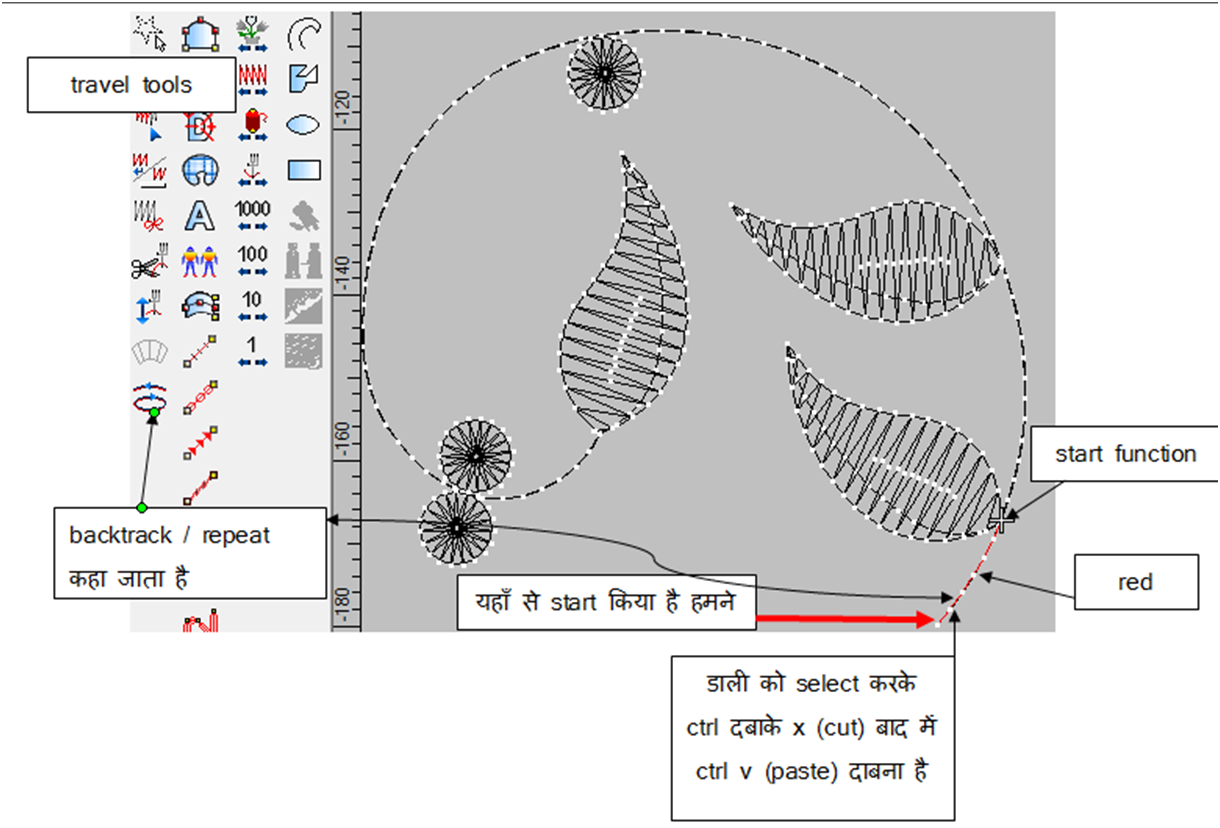
Now after pressing home, we have to select the branch from where we want to start and press Ctrl x and then Ctrl v so that once the branch disappears, we will see it again at the same place. Now its color (red) which you have kept will be visible.
Then we have to press the backtrack tools (the branch should remain selected then) so that a new branch is created on top of the same branch. We have to do this because run has to bring us back to where we started. Then left click twice above the mouse travel tools so that the start function comes back down.
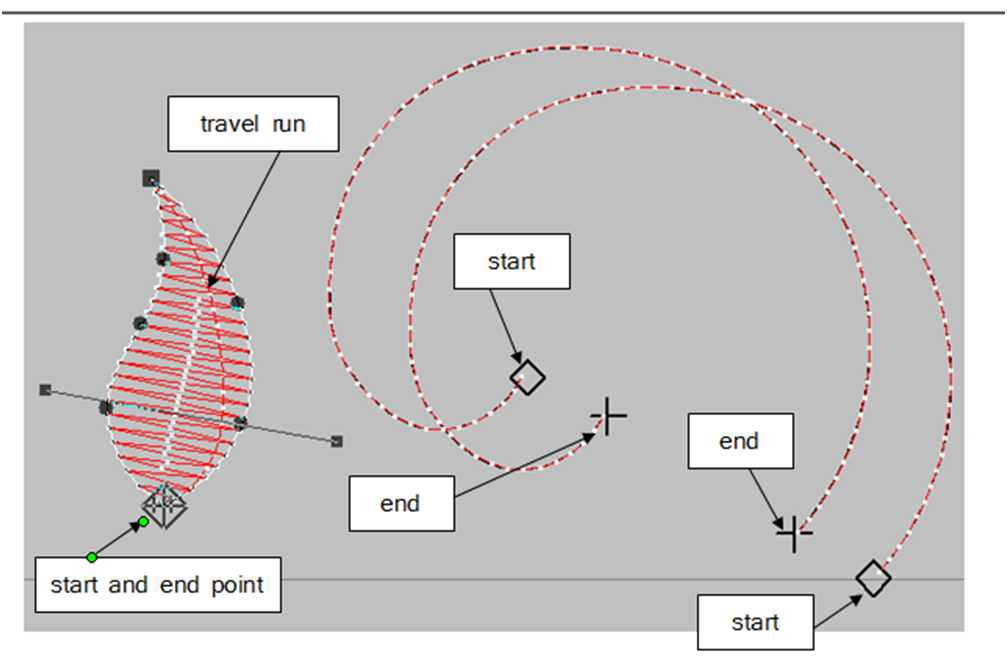
One thing should be kept in mind that we cannot join the start and end point of a run, that is why we have to use backtrack. Unlike them, you can keep the start and end point of the leaf anywhere from where you have to run the start function.
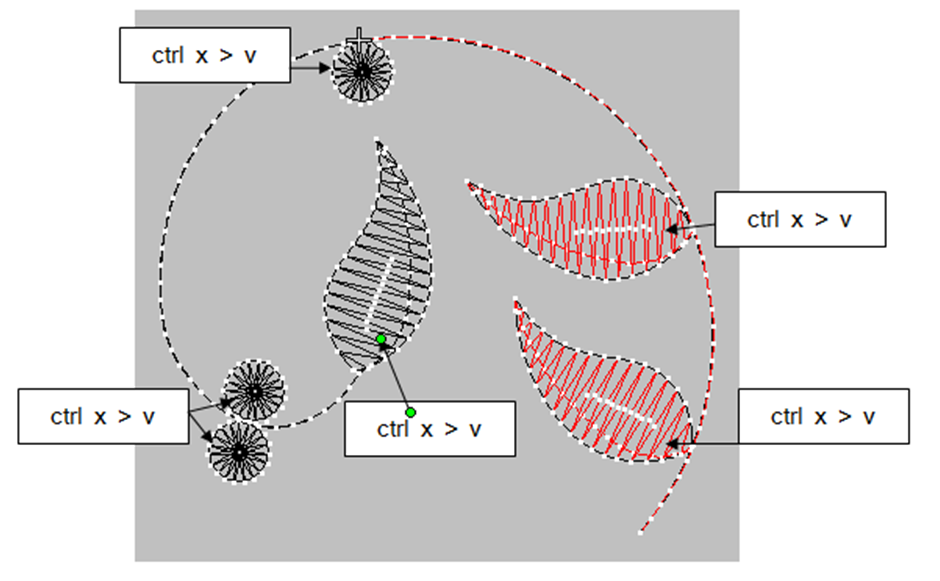
Now we have to keep running the start function as shown in the image, then cut and paste whatever comes in the way. In simple words, we should not use shortcut in the path on which we are walking, just keep walking straight. So let’s understand more in the next image.
After that, it is clearly visible that the start function has to go ahead of the arrow given in the keyboard and one after the other leaf has to be given Ctrl x > v as shown in the image below. Then by giving Ctrl x>v to the last leaf, you have to come back down from the arrow. So in this way work will be done on your machine and it will also run properly.
In the image below, you will see the work of backtrack.
Now you will understand that by backtracking, the start and end point of the second branch has come in the opposite direction. Only then the branch will be able to go back down. We do not want to run the machine by giving it a jump, we have to run it as smoothly as possible. Otherwise, the production of your machine will be very less and it will also get damaged.
Let me explain with an example, like climbing a ladder by jumping two or three steps, because of this, your climbing speed will also reduce later, if you climb step by step, then your speed will also increase and you will be able to climb peacefully.
Now we understand by making a part of the whole design.
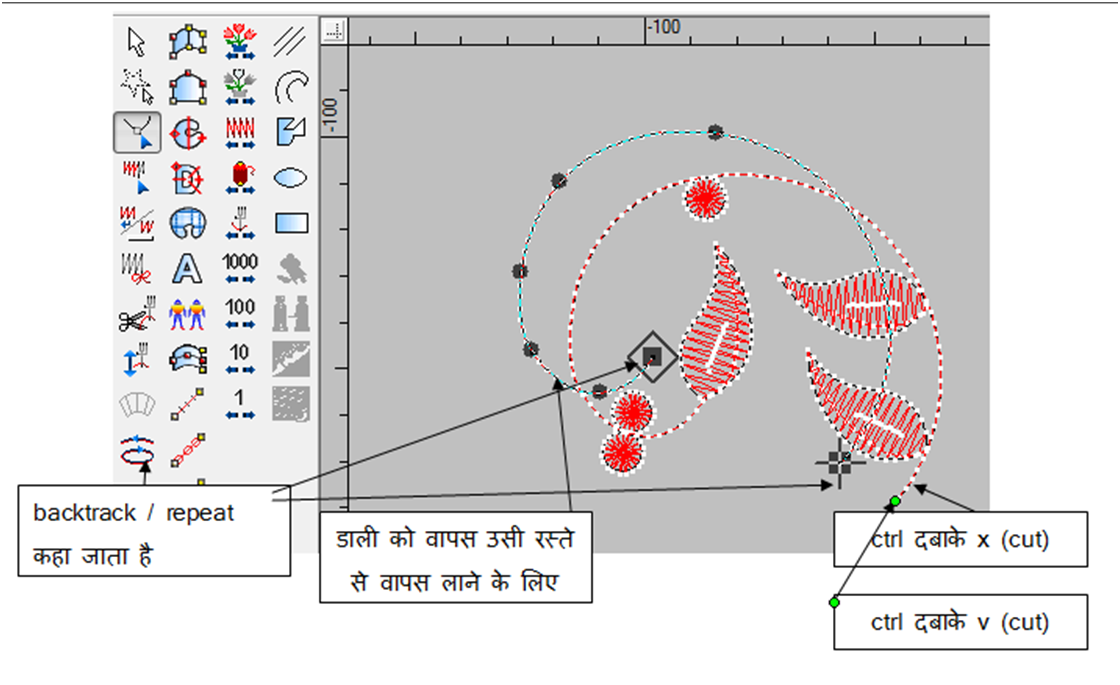
So this whole part is punching as you can see from the above photo
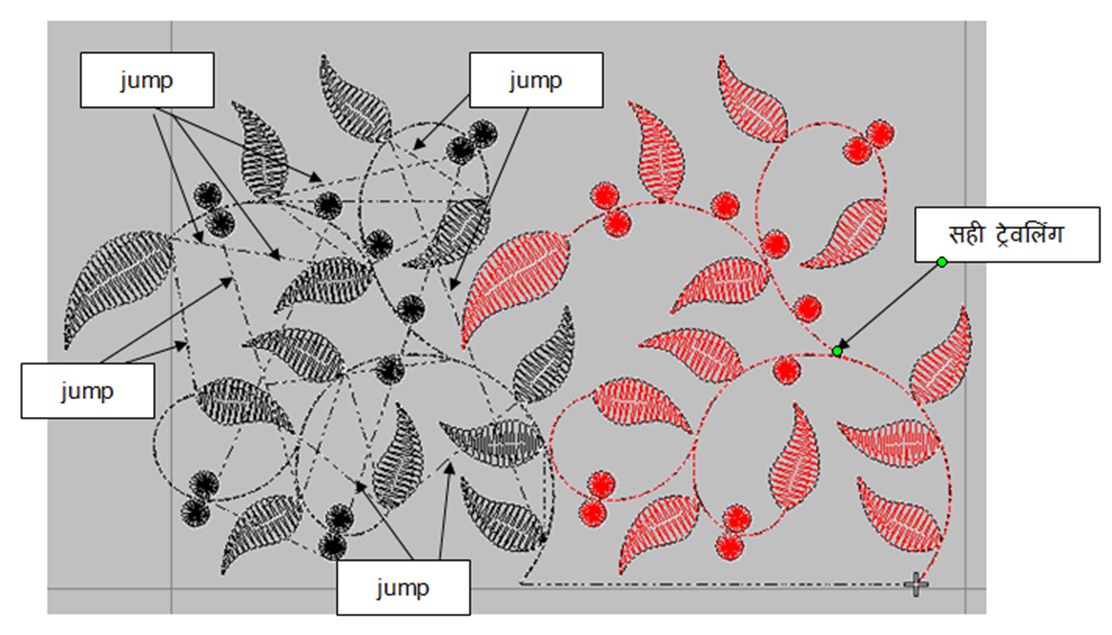
When you are punching the design, press (shortcut key shift C) to see where the jump is left. In this above image, you can see that the run which is visible will be cut off. It means that after making one leaf, it is going to jump from there and make another leaf. There the head of the machine will jump up and the thread can also be cut again and again.
Now the one with red color which is visible in the nearby image is perfect because we have cut and pasted it from right side, so it has become like running. So now you have to punch (cut paste) all the designs in the same way.
Once again I am telling that to bring back the run we have to use backtrack only, you cannot add its start and end point together. And in the rest of the leaves, you can join the start and end points.
If you use backtrack in the leaf, then another duplicate leaf will be created on top of it, because of that your stitch will also increase. By joining the start end point of the leaf together, a single run will come exactly in the middle of the bottom of the leaf, which is called travel run. You have to take care of this thing.
Let us see another example of it so that you do not make any mistake.
Above we learned to punch in one color. Now if there is more than one color many times, they will learn how to punch. This is also very easy, so you do not need to worry.
How to draw complete design work?
We will cut paste the design given below. So we have done the complete design drawing first, now let’s go ahead
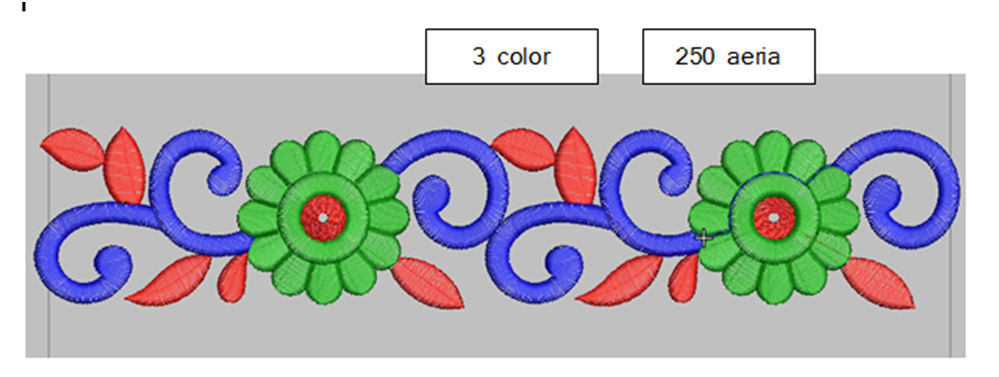
Design drawn in three colors
First of all, we will cut and paste one color, then the second color and lastly the third color, then you go on watching one after the other and learn well.
First of all, after the design is complete, press home on the keyboard so that our view starts appearing black.
Now we have to go to view color from the keyboard (shortcut key – Alt pressing V > V) or directly go to view in wilcom. So the option of all three colors will open in front of you.
Then you have to select whatever color you want to run first, it is not that we can only do the color which is visible in it first. As soon as you select the color and do OK, then your selected color will appear on the screen but its view will be black only because its cut paste is yet to be done. Learn from the image given below.
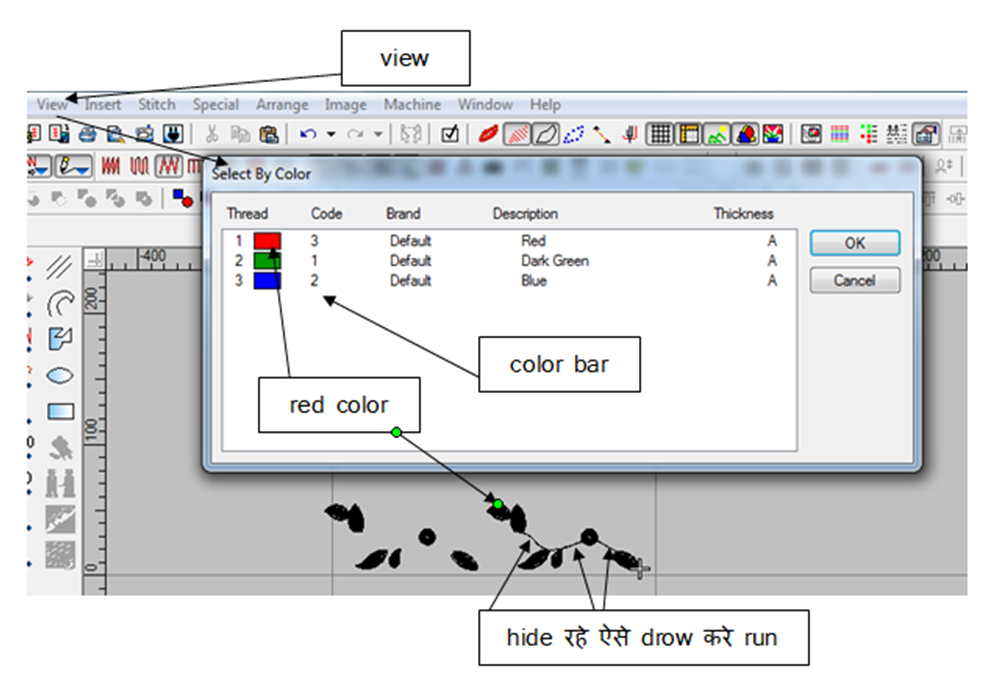
So this is our first color open now, now we have to cut paste with the same old method, in this I have started from where the start function is visible and the last leaf is visible above and finish there. Similarly, if the cut paste of one color gets over, then do the same for the other color as well. Below is the image of another color.
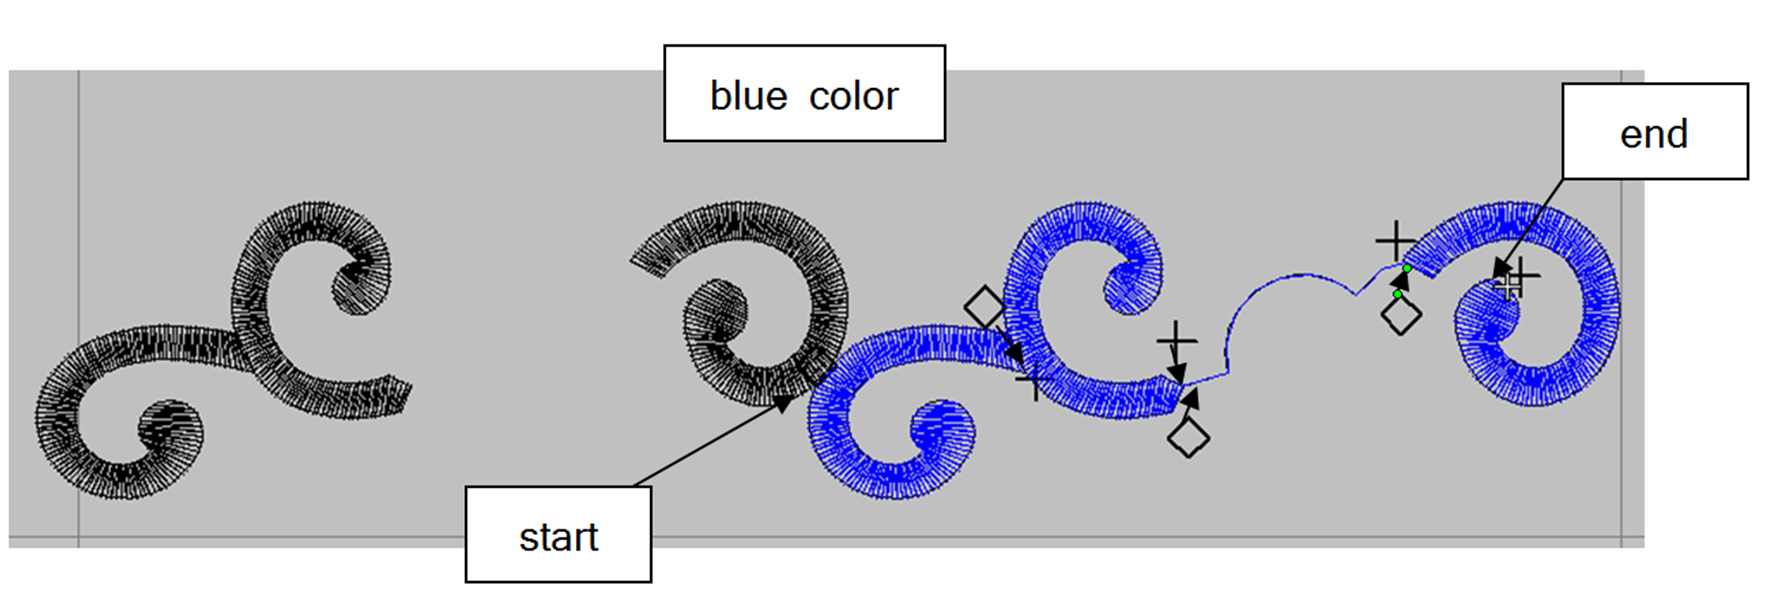
second color punched photo
After blue color we have to cut paste the last green color. Let’s learn from the image given below.
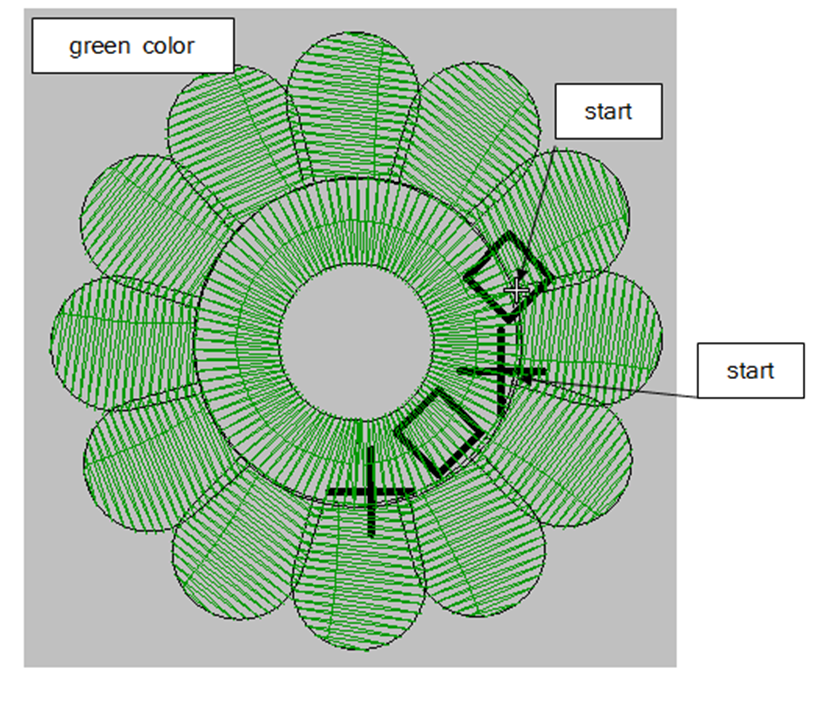
Now the cut paste of the last color has also been done as you are seeing. In that you can see that I have left the mark of start and end point because you can understand how I have kept the start and end point of each leaf.
I have placed the end point in front of the leaf where the start point is kept so that the start point of the nearby leaf comes next to the one where it has ended. Start end, start end, keeping this way, the entire cut paste has been done in the line.
Now we will see the punching of the whole part whether there is any jump left or not.
Below I have given the image of two parts, one of them has been punched and one is left, so you can see that one is looking correct and one is showing jump.
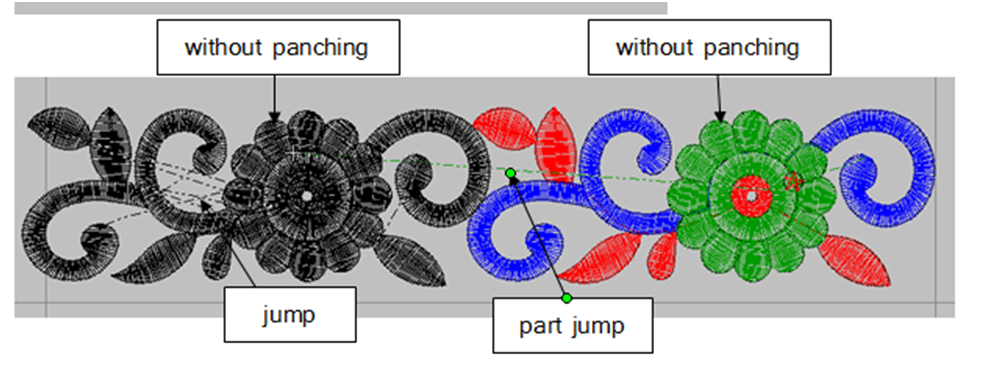
From the above image, you will understand from both the parts that how it looks with cut paste and how it looks without cut paste. You will see a lot of jump without cut paste.
Keep one thing in mind, whenever the punching of a design is completed, then lock must be applied like I have put in the above image (star red color). I have colored it red because it is visible to you, but there will be a green lock because we have punched the last color.
After the punching of one part is over, the second part is going to be made, then there you will see part jump, then there is no need to take any tension. Sometimes we have to keep some jumps in a design, if we go to remove this jump, then we have to run a run which is less visible after the work is done.
You must have seen the work of butti in many saris or dresses, then we will have to take a compulsory jump in that. If you run a run to get a jump in it, then it will not look good. And no one will even buy that saree.
When our punching of one part is over, then after selecting that entire part, we have to group it (shortcut key – Ctrl G) and put it above the nearby part. Then the lower part has to be deleted. So in this way you can do 2,3,4,5,6 color punching.
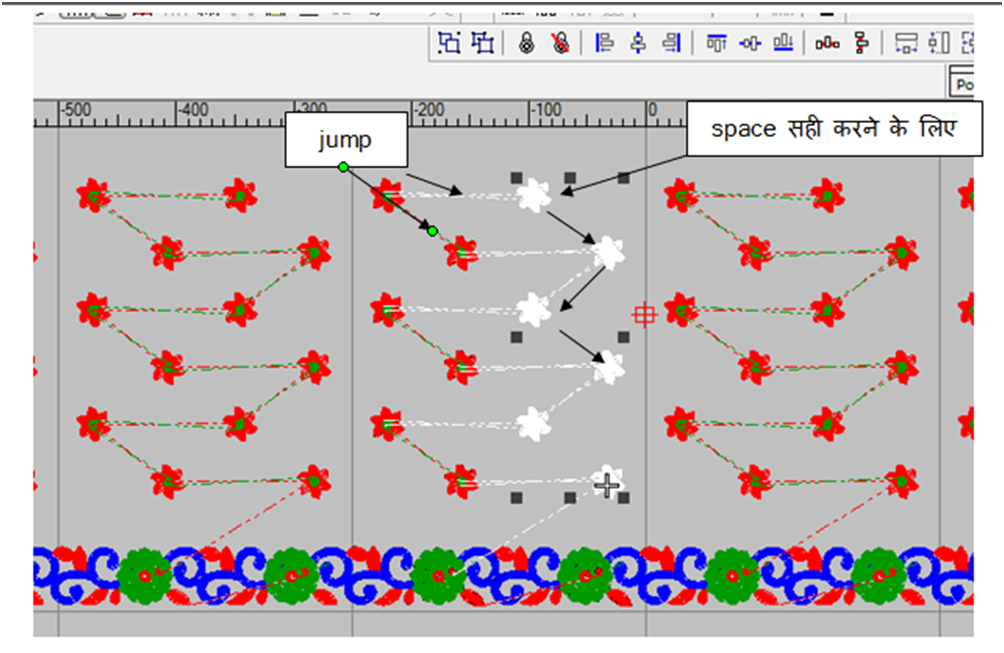
So in this way a jump is visible in the design, we have to take it, otherwise it will not look good after running, so jump has to be taken in this type of design.
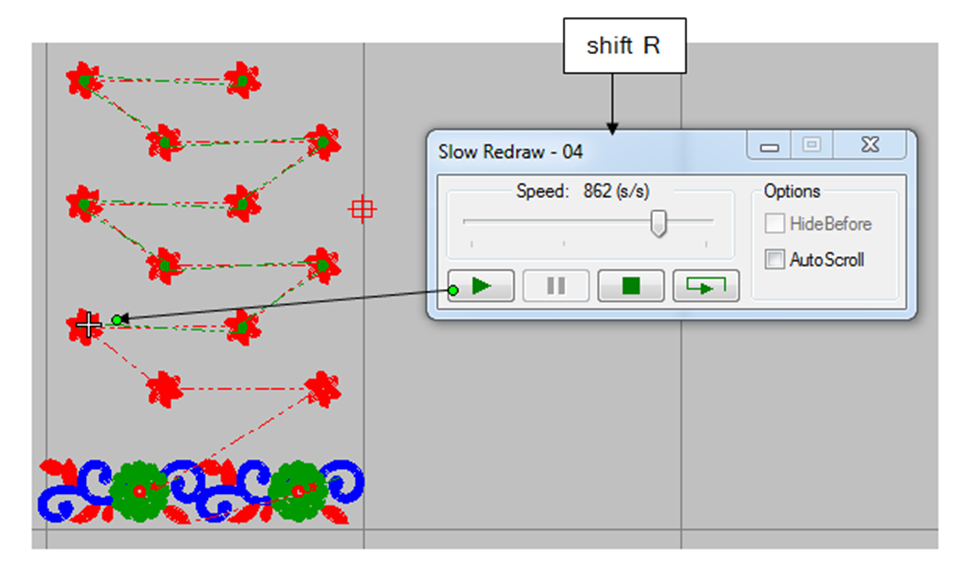
Now to see how you have done the punching (cut paste) of the design, you can see it by playing with the tools given below. Its shortcut key is (shift R) which I have also shown in the image. As soon as you play it will immediately show how you have cut paste it. By the way, there is another option to see the punching, so let’s see it in another image as well.
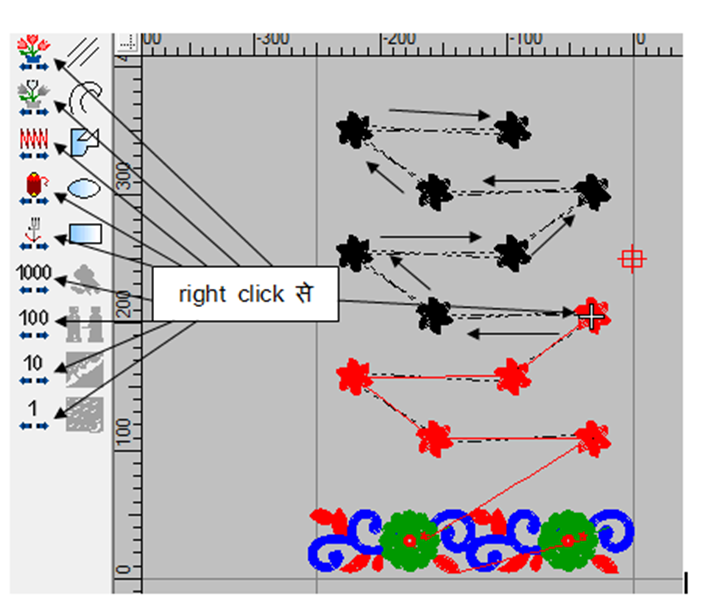
You will also know from the image given below how punching is done. You can see the cut paste by left and right through the mouse which is showing all the tools.
When you check with these tools, if the function stops somewhere while checking in the same color, then you can understand that there is something wrong there, then you can correct it by zooming in.
Tools above 1000 to check in multi are the best, if there is a fault in the design, then it will be caught.
You can also check with keyboard, in that you can also check punching with (pg up) and (pg dn) given near home tools.
So, we have taught you the punching of this thread very well. Now we will learn how to add sequins and cut paste.
How to add sequins in design.
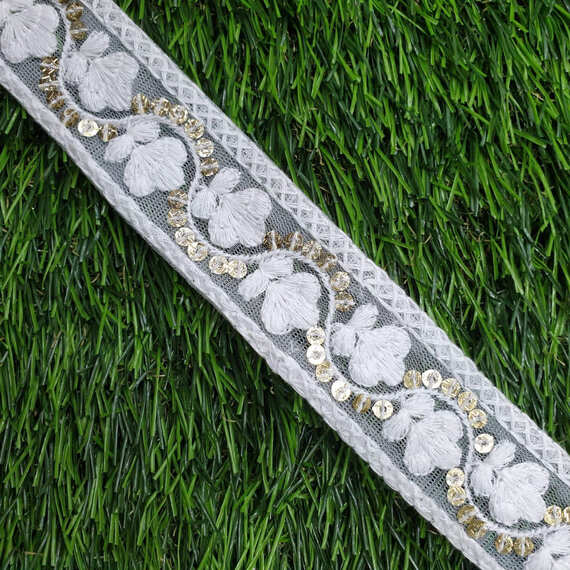
- There are 3 types of designs made in embroidery, in which 1 st of empty thread which we just learned cut paste.
- 2nd is to connect the sequin with the thread.
- 3 rd is dory (cording) and with it thread and sequin design is made.
These three are the form of different types of design.
- Now if we look at the machine, a separate machine comes to do multi (thread) work.
- The machine for running multi (thread) and sequin comes separately.
- The machine for dory (coding) also comes separately. That’s why we need to learn cut paste of all three.
तो हम सीखेगे sequin का cut paste ओर जोड़ना निचे दी गई image से सीखे |
Now let’s make a design of multi and sequin as well. First of all, understand that the option of jump in sequin design will look like this which I have shown in the image. In the next image we will see sequin inserted along with punching.
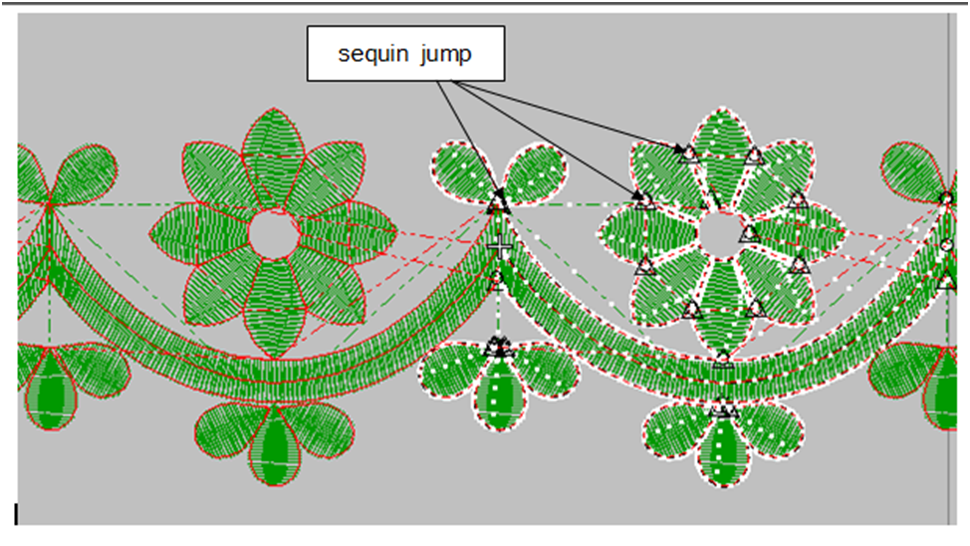
See in the image below how to apply cut paste and sequins on the work. To apply sequins, we have to do punching of both the colors first.
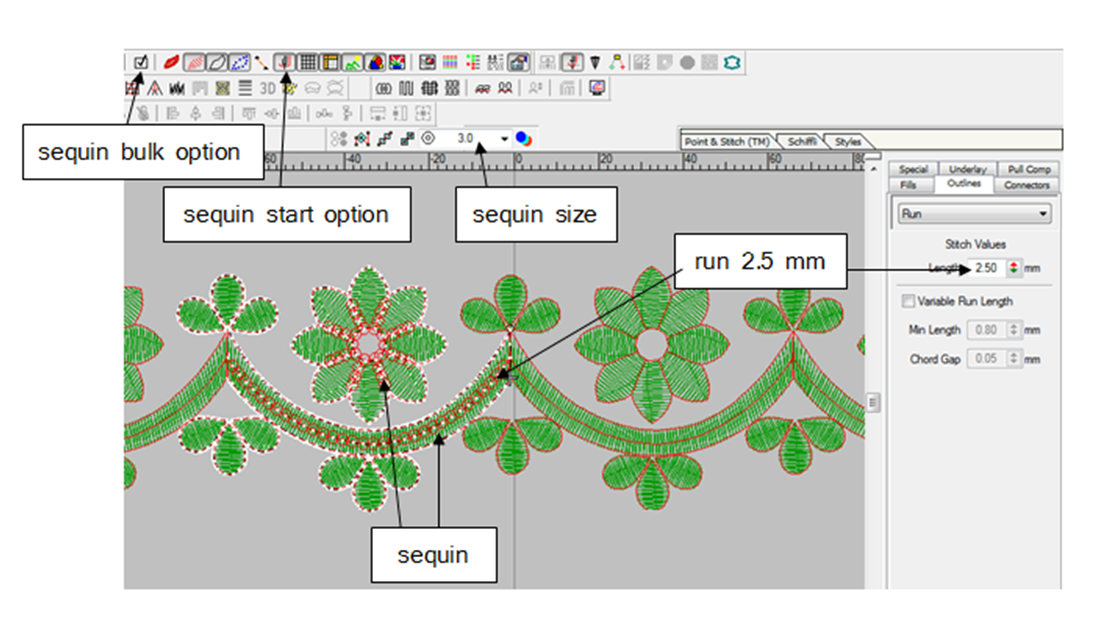
First of all we have to paste the cut of multi (thread) after that we have to paste the cut of the color in which we want to keep the sequin. After that we have to put sequins in it.
The first step is that first of all, at what distance we have to keep sequins, then set the run (2.5,3,5,7 mm) accordingly. Set according to the size of the run sequin.
The size of sequin comes up to 3,5,7,9 mm. And one more thing, to run the sequin, it is necessary to have the setting of that size in the machine.
To apply sequins, first cut paste of both the colors. Now run the green color first, then select the red color by Alt V > V.
Now select the whole color and select the start option of sequin, then set the size of sequin, then set the run, then OK the stitch edit given in the show pointer toolbar, then wherever we want to put sequin, there keyboard After reaching aero, keep clicking aero + space bar 1-1 times there and keep applying sequins. The sequin will appear as it is seen in the image.
The sequin bulk option is shown in the above image, what happens if you want to apply sequins a little quickly, then that option (shortcut key Q) has to be OK, then run from aero till where you want to keep sequins, then space once. If you have to click on the bar, the whole sequin will come together.
After starting the sequin bulk option, as far as you move forward, white color will be seen there, you have to take care of this because I am telling you that you should not forget to bind that option, otherwise sequins will be applied everywhere.
In the image given above, we have learned how to apply sequins.
How to do punching of code dory design.
Now the work of sequin is completed, now we will learn the design of coding (dory) and apply sequins in that too.
In the image given below, you can see that multi sequin and coding has also been done.
3 patents worked in this. 1st cut paste of multi has been done in it. 2nd cut paste of sequin is done in it and last 3 rd. cut paste of coding is done. Which is clearly visible in the image.
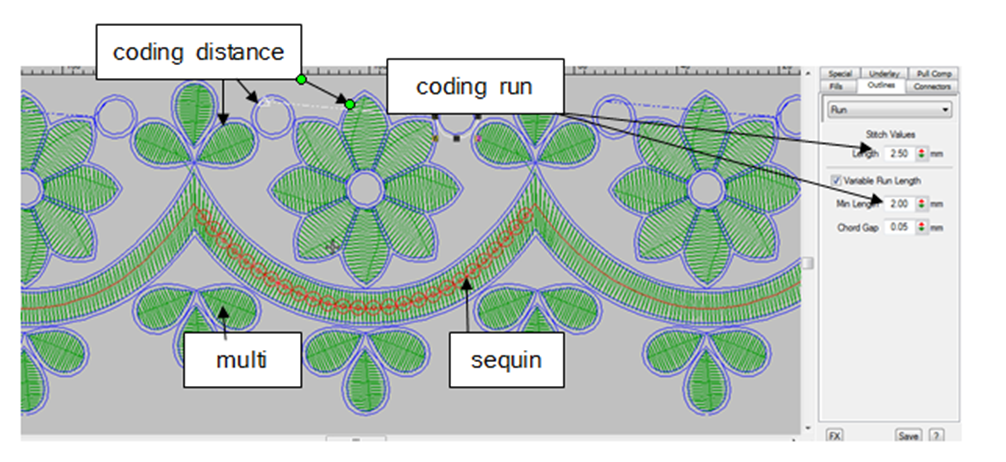
Whenever we make a design, the cording (dory) has to be run in the last. If you want good finishing in the coding run, then set the variable run below the run as shown in the image.
Now when you use cording run then the difference between the two is very important. The blue color that is visible below is the cording being done.
According to the code dory, decide the distance of both the runs. In the image given below, I have kept the distance of (.80) because the code is according to the size of the dory.
If there is a little more dory, then the distance will be up to 1, 1.25, 1.5. Whenever you do the punching of the coding run, keep in mind that backtrack will not be used in it. And to run the design of coding, it is necessary to have coding in the devise machine.
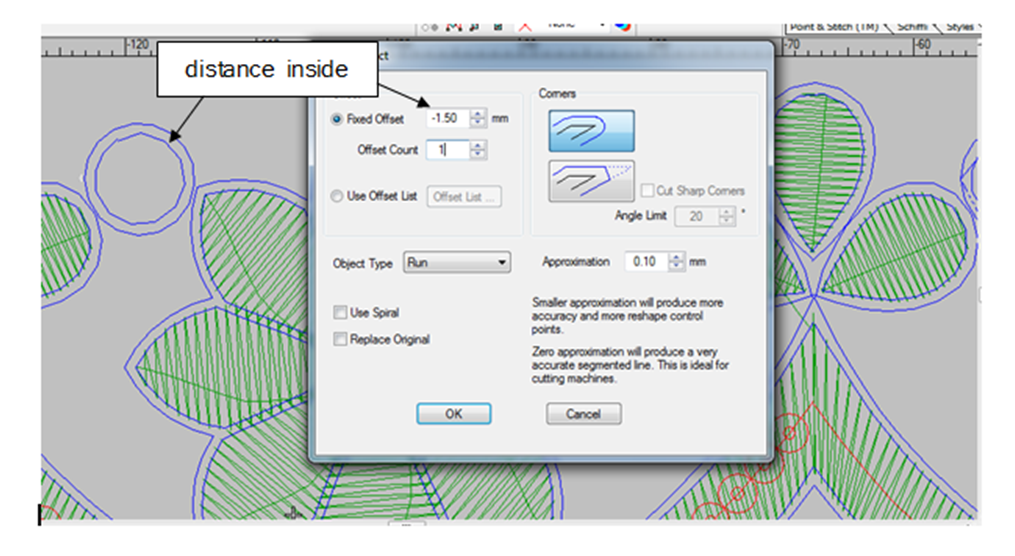
Click on Alt I (insert) O (offset object) to make the same coding run below or above in coding, then a menu bar will open, then the distance to be kept in fixed offset has to be entered in it.
(Example: If the distance of 1.25 mm is to be inserted inside a round, then write -1.25 mm and if it is to be inserted on the outer side, then write 1.25 mm, then it will come. I explain by giving another image below.
So it is seen here that if you want to distance inside, then write -1.50 mm so that the same round will be made inside, as seen in the picture, and if you want to distance outside, then write +1.50 mm, then the outside will be the same. round will come.
Then the low offset count has also been given, which will make as many rounds as you want to make. And also given the option of corner nearby, you can set it as you want. And in the below type run, tripal run you can keep what you want to set but in coding only run will work and no one else.
I have given another picture of coding punching how to do punching. It is seen in the image below that the start and end point of all the dory is kept same so that the dory can run properly.
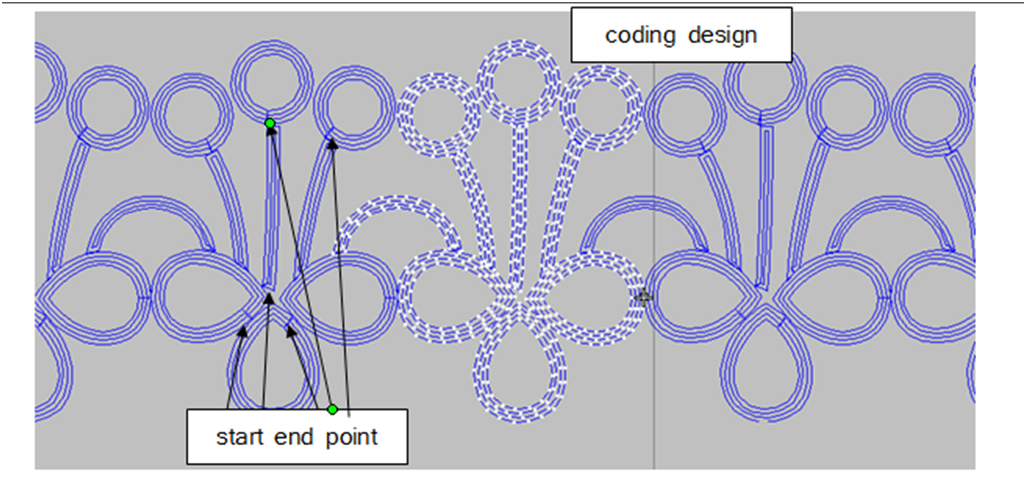
So here our work of punching (cut paste) is also completed.
What is the process to run the design in the machine?
Now we will learn to convert our design into DST file to run in the machine. This is very easy, when you OK any design and go to convert it to DST, first of all check it completely, its width, height, lock, all this is very important so that you do not have to stop the machine again and again.
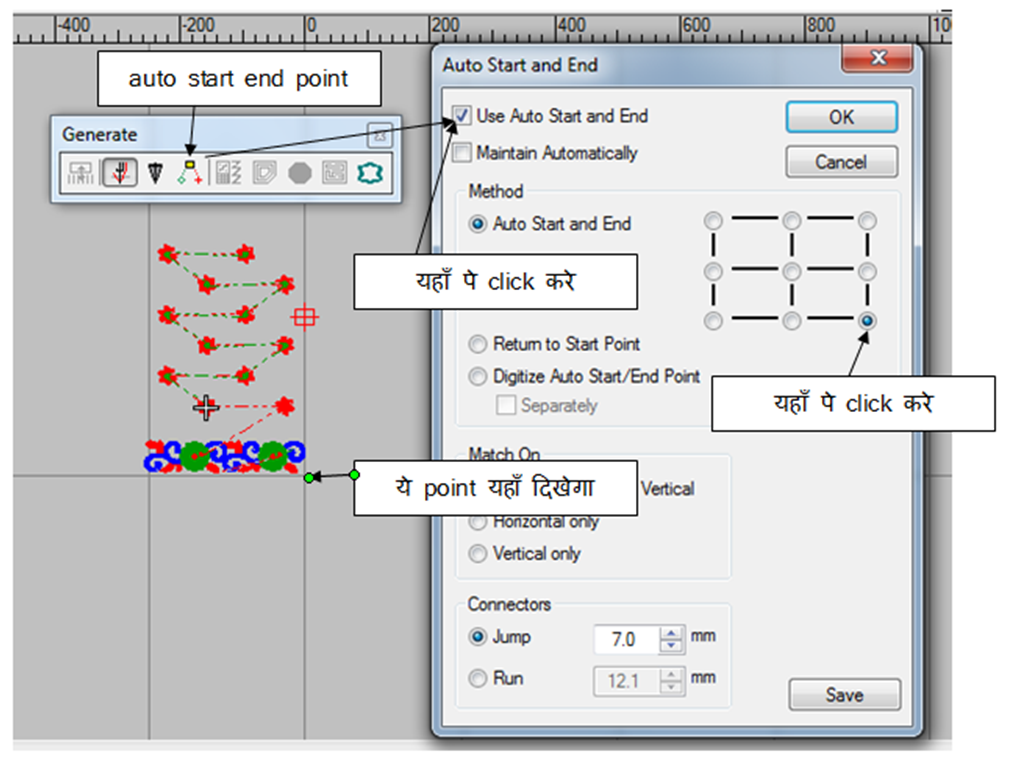
Know one more thing when after completing the design it is very important to set its auto start and end point. You will see that option in wilcom. This point has to be kept below as shown in the image because when the design is set in the machine, it will measure from the same point. Which will be understood from the image given below.
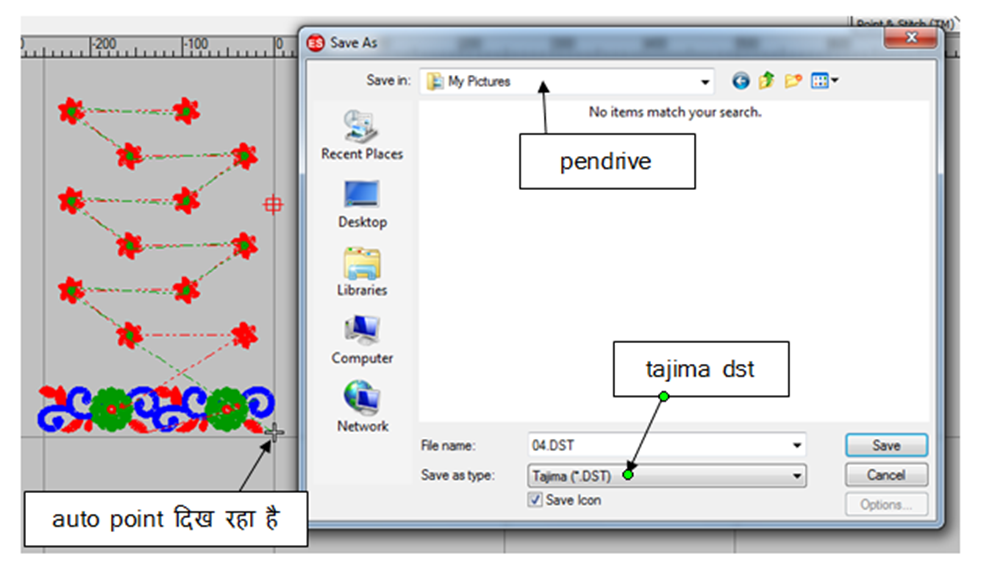
Now learn DST convert which is the last thing you have to do. In the image below, you can see the last work in which you have to select the pen drive, then go to the save type below, tajima DST (shortcut key is to press T twice) then OK.
Later the file has to be uploaded in the machine and the design has to be started.
Here the journey of making the design is complete, if you do not understand anything, then write me in the comment option given below so that I can help you.
Conclusion
We hope that you understand this program, learn it and learn your own Design Course -Embroidery Design for free and start working and earn money. To learn another new course, do visit our usanewsread.com site.
Learning embroidery designs is a delightful and fulfilling endeavor. By following this step-by-step guide, you can easily develop your skills, from mastering basic stitches to creating intricate designs. Remember to gather the necessary supplies, practice regularly, explore design resources, and engage with embroidery communities. With time, patience, and creativity, you’ll be able to create stunning embroidery designs that showcase your unique style and talent. Happy stitching!
FAQ-How to learn embroidery designs easily 2023 free
What is the most common embroidery?
By learning Wilcom ES this design course program, you can easily make any design on clothes, as you must have seen Cap, Jeans, Dress, bags, Garment, and every logo of anything else.
What is the most popular type of embroidery?
SATIN STITCH
RUNNING STITCH
CORDING STITCH
DORI WORK
FANCY STITCH
STEM STITCH
COIL AND CONTOUR STITCH
BACK STITCH
MANUAL AND TRIPLE MANUAL
MOTIF FILL
COMPLEX FILL
LETTERING TOOLS
FREE PDF DOWNLOAD
10 basic embroidery stitches
SATIN STITCH
RUNNING STITCH
CORDING STITCH
DORI WORK
FANCY STITCH
STEM STITCH
COIL AND CONTOUR STITCH
BACK STITCH
MANUAL AND TRIPLE MANUAL
MOTIF FILL
COMPLEX FILL
LETTERING TOOLS
machine embroidery classes in Chennai
This complete course, taught absolutely free on usanewsread.com, is made up of 3 parts.
machine embroidery classes near me
You do not need to go anywhere else to learn computer embroidery course because in usanewsread.com this entire course is taught absolutely free of cost
machine embroidery courses online
This complete course, taught absolutely free on usanewsread.com, is made up of 3 parts.
